
Raspberry Pi Retro Radio – Part 2: Hardware setup
Here’s the second part of the Raspberry Pi Retro Radio guide. In Part one I showed you how to prepare the housing. Obviously you need more than just a ripped off retro radio to get this thing going. This was actually one of the trickiest parts building the radio because it required a lot of planing, investigation and decisions up front. After studying this blog post, you should have an idea of what parts you might need and how to assemble them. There is also a full list of parts at the end of the blog post so you can spend your time building it, instead of googling what you need.
Audio output
Since a Raspberry Pi has only a 3,5 mm jack you will need something you can hook up the speaker chassis to. There are several options to do this. The first option is to buy some PC-speakers or use some old ones you have lying around and connect them to the 3,5 mm jack. Since the sound quality is pretty bad I wouldn’t recommend it, but it is by far the cheapest solution. The second option is to buy a USB sound card and connect the speakers to them which is a bit more costly but should provide better sound quality. A third option is a DAC-Hat for the Pi which you could connect to a separate amplifier or the radio itself. There are several of those around ebay and amazon for about 20-30€.
Because I wanted to use the built-in speaker of the radio and the radio didn’t have any RCA jack I decided to go with a HiFiBerry AMP+ connected to the GPIO-Pins of the Raspberry Pi. You can get one for approximately 60€ and the needed external power supply for 15€. Be sure to check some price search engines as the price might vary a lot.
Pros:
Small Very good sound quality 2 Speaker chasis can be directly attached External Power Supply powers the AMP+ and the Raspberry Pi.
Cons:
Expensive External Power supply needed Blocks some GPIO-Pins If you need more than 25 watts output power you need an other solutionas
Connecting the AMP+
This one is easy, the only thing you need to do is to stack the AMP+ onto the Raspberry Pi. Pretty easy huh? 😉
Wiring
Why do you need a circuit board? First of all you don’t need it. You could wire everything up by soldering it to the AMP+ or connect everything to it with some plug cables. The downside of soldering everything to the AMP+ is that you could damage it while doing so and that you won’t be able to tear everything apart easily anymore. In my opinion plug cables don’t make up for a reliable connection although they are perfectly fine for wiring something up quickly for testing purposes.
In case you are a DAC or AMP hat you should check which GPIO pins are used by them. The HiFiBerry AMP+ Hat uses GPIO 2-3 and GPIO 18-21. These are the actual GPIO numbers (BCM GPIO) not the Header Pin numberings. Check other HiFiBerry Products here.
LED wiring
The LEDs are connected to an NPN-Transistor so they can be wired to the 5V (Header 4) output and only one GPIO–Pin is blocked. There is a 10k Ω resistor to the base of the NPN-Transistor this resistor prevents the GPIO Pin from short circuiting. Be sure to calculate the resistors connected between the LEDs and the 5V pin correctly. A 330Ω resistor should be suitable for yellow or red LEDs.
- Transistor base – GPIO25 (Header 22)
- LEDs – 5V (Header 4)
- LEDs and Transistor – GND (Header 6)

Button wiring
In reality the buttons should be the buttons of your radio. We have 5 Buttons connected:
| Function | GPIO | Header |
|---|---|---|
| PLAY | GPIO17 | Header 11 |
| PAUSE | GPIO22 | Header 15 |
| MUTE | GPIO27 | Header 13 |
| PREVIOUS | GPIO5 | Header 29 |
| NEXT | GPIO6 | Header 31 |

Rotary encoder wiring
The rotary encoder is used for controlling the Volume. It is wired to the following pins:
| GPIO23 | Header 33 |
| GPIO24 | Header 35 |
| GND | Header 6 |

Complete wiring
This is the complete wiring with everything connected:

The circuit board
I soldered everything on a small circuit board with a 40 pin connector to be able to connect it to the header of the AMP+ via a cable. My goal was to connect every hardware part to the circuit board so I would still be able to remove the Raspberry Pi in case I wanted to plug in a new version or it gets broken. You have to find a solution that suits you well by yourself. I soldered the LEDs to the circuit board with a wire and used some shrink tubings to cover the connection. You could use some connector for that. The Buttons of the radio are also wired to the circuit board.
As you might notice I only connected four buttons of the radio. The reason is, I used a rotary encoder with an integrated switch, since i wanted to be able to mute the radio by pressing the volume button. Since this it not suitable for every radio I used 5 Buttons for the schematics but you should be able to figure out how to connect a rotary encoder with integrated switch by yourself in case you need it. 🙂
Putting everything together
After soldering the circuit board with the buttons and LEDs I was ready to put everything together. I mainly used plastic screws and spacers as well as cable ties and some hot glue to keep everything in place.

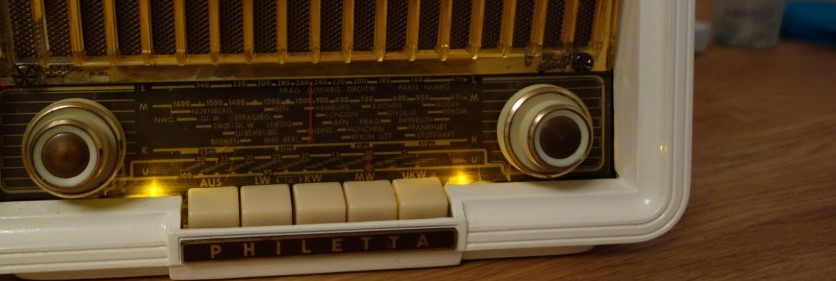
I simply used some hot glue to replace the original light bulbs with yellow LEDs.

The Raspberry Pi is mounted to the base plate with some plastic spacers and screws.

Since the radio is pretty small it was a bit difficult to find the right spot for the Pi and the circuit board. I came up with this solution. A bit messy on the upper side…

…but neat and tidy at the bottom side.

List of parts
So here is the complete list of parts.
Hardware
- Raspberry Pi 2 or 3 (Get a Kit with power supply and
- SD-Card (at least 8GB)
- HiFiBerry AMP+
- External Power Supply
- WiFi Dongle
- Circuit board
- 40 pin cable (Male – Male)
- 40 pin connector
- NPN transistor
- 1x 10k Ω resistor
- 2x 330 Ω resistors (depending on your LEDs)
- 2x LED in any color you want
- Rotery encoder
- Optional: A case for the Pi
Consumables
- Wires
- Cable Ties
- Shrink tubings
- Hot glue
Tools
- Soldering iron
- Soldering tin
- Pincers
- Screwdrivers
- …
The next blog post will be about the software…